Run the new Integrated Development Environment for DataWeave without a Docker dependency
The DataWeave Playground is an integrated development environment that enables you to experiment with complex Mappings and Transformations outside of AnypointStudio. When we first looked at the Playground, a creation of Mariano De Achaval and the Mulesoft Dataweave team, it was an experimental version running inside of a Docker container. While still a work in progress, through the magic of GraalVM, the Playground runs sans Docker, as a binary, on Mac, Linux and Windows.
In my earlier article Transformative Moments we started in the middle of the story, demonstrating how to get immediate business value from the DataWeave Command Line interface (DW CLI). We went on to learn how to create Command Line Services which created information pipelines between data sources and the sink. Now we’ll rewind to the beginning of the story to look at the most important piece of all, the DataWeave Playground. You’ll learn how to run the IDE as a standalone application, outside of the Docker container.
To begin we’ll create the DW CLI folder and the environment settings which are needed. To make these changes permanent you can add them to your path in the Windows environment dialog settings or to the .bashrc file in your Linux HOME directory.
CLI Configuration Settings
rem Configure DW CLI home in Windows
md %USERPROFILE%\.dw
set DW_HOME=%USERPROFILE%\.dw
set DW_LIB_PATH=%DW_HOME%\libs
set PATH=%DW_HOME%\bin;%PATH%

---

# Configure DW CLI home in Linux
mkdir $HOME/.dw
export DW_HOME=$HOME/.dw
export DW_LIB_PATH=$DW_HOME/libs
export PATH=$DW_HOME/bin:$PATH
Download the DW CLI runtime
In the environment settings above we configured the location for the DW CLI runtime onto your path. Download the runtime from the DW CLI Github repository. The Zip files are located in the Manually paragraph.
After you unzip the download, install the bin and libs folders into the .dw folder you created in the Initial Configurations section above.
Running the DW Playground
After you’ve completed the download and completed the installation, we can take a look at the most prominent part of the DW CLI, the Playground. You can refer to the articles above for more information on the wizardry you can unleash with the DW CLI and you can use the earlier examples in the Playground.
$ dw --eval --spell Playground

Fetching `null's` Grimoire.
Cloning into 'C:\Users\DresdnerMitchell\.dw\grimoires\data-weave-grimoire'...
remote: Enumerating objects: 62, done.
remote: Counting objects: 100% (62/62), done.
remote: Compressing objects: 100% (51/51), done.
remote: Total 62 (delta 16), reused 35 (delta 1), pack-reused 0
Unpacking objects: 100% (62/62), 9.79 KiB | 92.00 KiB/s, done.
Http Server started at localhost:8082
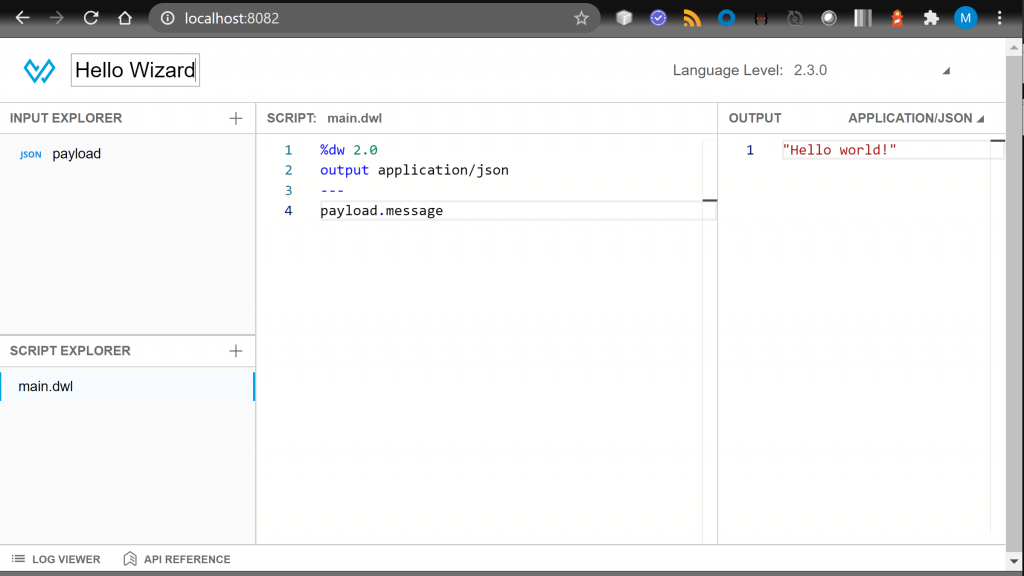
The first time you invoke the Playground it fetches the code from the Git repository, installs it into your .dw folder and casts a spell to run the Playground. When the Playground starts you can access it using your browser, it listens on Port 8082.

The IDE is familiar and intuitive, you may recall the look and feel from the Docker implementation. The Input sources of information are located on the left, scripting is in the middle and the output displays on the right.
Clicking on the default input type allows you to change to another type such as XML or CSV.
You can open the DW API reference from the button bar at the bottom and the Log Viewer as well. This is a nice feature, providing most of what you need in the IDE.
In the top right you can change the language level to conform with the runtime version you’ll be working with. This assures that when you bring you code in to Anypoint Studio it will work the same.
You can find plenty of examples to try out in the Playground IDE from the DataWeave Cookbook. and in the earlier article where we discussed the experimental Docker version. These articles should give you plenty to get going and help to improve your skills with DataWeave.
If you benefit from and enjoy using the Playground, be sure to give the project a Github Star!
