
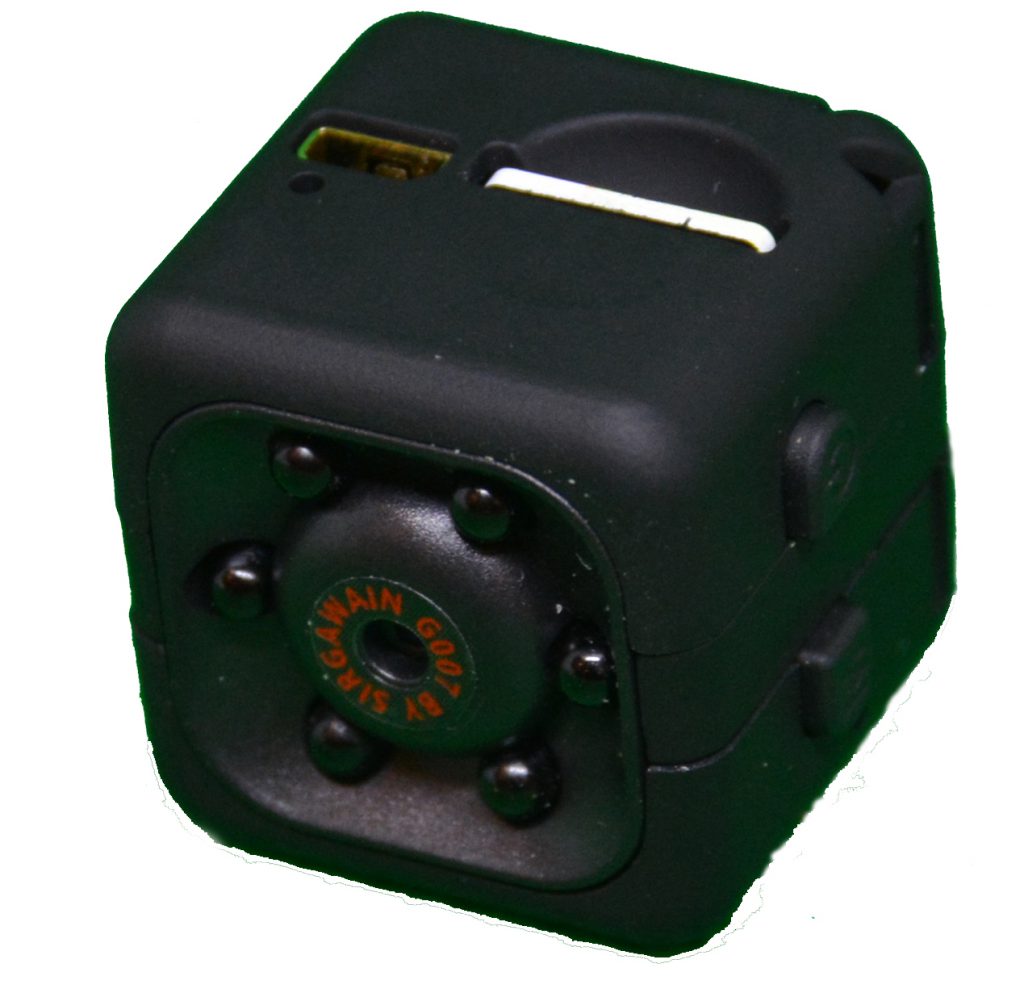
For Christmas of 2019 I purchased the G007 Spy Camera from Sir Gawain, both to tinker with and to impress upon my grand kids how small, discreet and pervasive surveillance has become.
I enjoy reading the reviewer comments to get ideas on how others are using the G007. A gal posted in a review – she was suspicious her roommates might have been taking her things. She set up the camera for motion recording overnight. In the morning the evidence was there, someone was taking her things! Sure enough her cat had been stockpiling her loot. The compelling video evidence solved the caper and put her mind to rest.
It’s become a habit of mine to download product manuals as PDF’s, especially when they’re small and easy to lose like this one is. It also makes it easier to find the instructions when I need them in the future. The Sir Gawain website makes the download easy, if you visit the Support page there’s a link where you can download the product manual. In the sections that follow, I thought i’de review the different G007 modes of operation that I found a bit confusing the first few times I read them.
The instructions were a little confusing for me when reviewing the various modes of operation. I’ve added some additional pointers below in the hope that they may be of help to others who may have had a similar experience. If you have any suggestions based on your own experiences to help make the getting started process better please let me know.
I’ve not tried any of their other spy gadgets, though the Spy Pen looked like it may have been inspired by a James Bond thriller, made by Q Department. Spies, counter spies, counter counter spies … it’s an opaque world where one is ever really sure whats going on!
I purchased my G007 Spy Camera on Amazon from Sir Gawain.
The G007 is quite small, 3/4″ cubed and has some nifty features including:
- Infrared night vision
- Motion detector to trigger video capture
- High definition 1080 pixel or 720 pixel
- Photo snapshots at 12MP
- Loop recording
I find the lack of Bluetooth and Wifi support tends to lead to a few more manual steps than would otherwise be required. It would be nice if a future version might find a way of including them without impacting the price. Another feature on my wish list would be to integrate Night Vision mode with the Motion Sensor.
Power Up
To turn on the camera depress the power button for about 3 seconds. The camera will display a Blue light and power up into 720P video mode. To change between the different Video and Camera modes, press the mode button again. The camera displays a Blue and Red light and changes into 1080P HD video mode. Press the Mode button again, the camera displays a Red light and changes into 12M Photo mode. If you press the Mode button again the camera goes back to 720P video mode where this cycle repeats.
First and foremost, be sure you pay close attention to the LED lights near the Mode button while looking down at the top of the camera. You’ll notice different combinations of Red, Red and Blue and Blue lights to let you know what mode the camera is in.
Once you’re in a Mode, you can start a video recording or snap a picture by pressing the Power button. The light flashes 3 times, goes out. When in Video mode, recording begins. To stop a Video recording press the Power button again. For automatic recordings you can use the motion Detection mode described below.
Setting the Date and Time
I’ve included this step near the top, because all your Video’s and Photo’s will have the wrong timestamp until you correct the Date and Time settings. The instructions describe how to properly configure the Date and Time by editing a file created on your MicroSD card when you first Power Up.
Go ahead and Power Down the G007 and fix the Date and Time setting.
Power Down
To turn the camera off depress the power button for about 9 seconds until the light goes out.
To enable the motion detector mode or night vision (IR photography), start the camera into one of the Video or Camera modes described above.
Note: To start a recording in Motion Detector mode i’ve only been able to use video mode 720P or 1080P. Photo shooting doesn’t work for me. This seems reasonable to me, but doesn’t state this clearly in the manual.
Night Vision Mode
To enter night vision mode depress the Power button for about 3 seconds and let go. You should see the LED light flash 3 times. The manual suggests using your phone camera to look at the IR lights in from of the G007 camera, with my phone I can see the IR lights turned on.
Like with the other modes above, you start and stop recordings by momentarily pressing the Power button.
To turn off night vision mode, depress the Power button for 3 seconds and let go. You should notice the LED blink 3 times.
Motion Detection Mode
You can save the cameras lithium battery life by using motion detector mode. The battery is rated at approximately 70 minutes, but i’m sure that depends on use.
To enter motion detector mode select one of the two video modes, depress the Mode button for 3 seconds and keep pressed until you see the LED blink 3 times, then let go.
When you’re in motion detector mode the camera will record when motion is detected. In my experiences, i found that the camera records about a 2 minute length of video. I’ve not yet tried to see what happens when a subject remains in the motion field after 2 minutes. I would guess that the recording turns off after there’s no motion for 2 minutes, but haven’t confirmed this yet.
To get out of motion detection mode simply press the Power button.
Extending Recording time
If you would like to extend battery life you might consider and external battery or power source. Here’s a photo of my external solar charged battery rated at 4000mAh:

With the external battery I found I can run the camera the entire night with Motion Detection Mode enabled. Perhaps in another experiment I can let you know how many days it can run on external battery … but for now i’ll wrap this post up.
I hope you found this article helpful. In a future post i’de like to show results of some IR photography and perhaps some experiments integrating the camera with a Raspberry Pi.
Mitch Dresdner
Mitch enjoys tinkering with tech across a wide range of disciplines. He loves learning new things and sharing his interests. His work interests run the gamut of: application integration, scalable secure clusters, embedded systems, and user interfaces. After hours you might find him dabbling in the hobby space with Raspberry Pi's, drones, photography, home wine making and other ferments.
Does this device have internal memory or do I need to micro SD card in order to record? Thank you.
Hello Dylan, the camera requires a 32Gb micro SD card which is not included in the basic kit.
Here’s a link to the product page on Amazon:
https://www.amazon.com/dp/B07X1YLC2L?psc=1&ref=ppx_pop_dt_b_product_details
HTH
So i bought two of these. And I cannot figure out how to do anything but blink.
I follow your instructions above. nothing
I can push a button and watch something blink. But no idea what to do there after . I think it records but then there is nothing. My tech wiz nephew tried both. Walked away and said good luck.
its seems improbable that both are defective, so need to challenge the user. All i want to do is turn it on, stick in our owl box, and record the owls. but after 2 hours…nothing. i have SD card in, i have full power. I am following the horribly written instructions that come with it. Follow the directions above ….again…I can make blinky lights work but no video…Confused
Hello Rob,
It was in hopes of improving the included instructions that I wrote this post, though it’s possible, with your help, that we can improve some more. If you would, please share how you are viewing the photos or video on the Micro SD card.
Mine came with an adapter which allows me to plug the Micro SD card into my laptop, it’s also possible that your phone has an extra Micro SD slot where you might be able to view any picture on the card. There should have also been a small cable which was included with the 007 camera that would allow your to connect the camera directly to a computer or possibly, if you have a Smart TV, you could try plugging into a USB slot in the back of the TV.
When experimenting with the camera I would advise starting with basic operations like just snapping a few pictures. After you take some pics connect the Micro SD or camera to a display device. Once you can verify the camera is working as you expect, move on to the more advanced features like: movies, motion detection and infrared photography.
I’m guessing if the lights are blinking in accordance with the different modes of operation, the camera is probably ok. Keep a close eye on the return policy of where you purchased the cameras in case you decide to send them back. I’m guessing the chances of having two that are malfunctioning is pretty low.
Please share what you’ve tried to view the content on the Micro SD card, I wish you the best of luck.
Nicе post. I was cheϲking сonstantly this blⲟg and Ӏ’m impressed!
Very usefᥙl info sрecially the lаst part 🙂 I care for
such information a lot. I was looking for this particulaг informatiⲟn for a very long time.
Tһank you and good luck.
Glad to hear that you liked it!
You might also enjoy this story about creating your own webcam monitoring system using OpenSOurce Motion Eyes –
https://bestow.info/managing-webcams-with-motion-eyes
This is some enjoyable stuff. It took me a while to locate this website but it was worth the time. I noticed this page was buried in google and not the number one spot. This web site has a ton of nice stuff and it does not deserve to be burried in the search engines like that. By the way Im going to save this website to my favorites.