There’s many great options for getting started with Kubernetes and most are easier to get moving forward with than ever before. Friction has been greatly reduced.
Kubernetes is a cooperating set of nodes in a clufster which can scale on demand to handle fluctuating workloads. The control plane manages the scalability and fault tolerance of nodes in the cluster. Nodes will run some number of pods and generally a single container within a pod, though there are use cases where you might find a sidecar pod which provides reference data or other support to the pod.
Containers which run in the pods may be Docker containers, but they don’t have to be. They might be CoreOS, Rocket (rkt) or some other container. In the examples which follow we’ll be leveraging a Docker container we built in a previous example.
Kubernetes cluster and dependencies
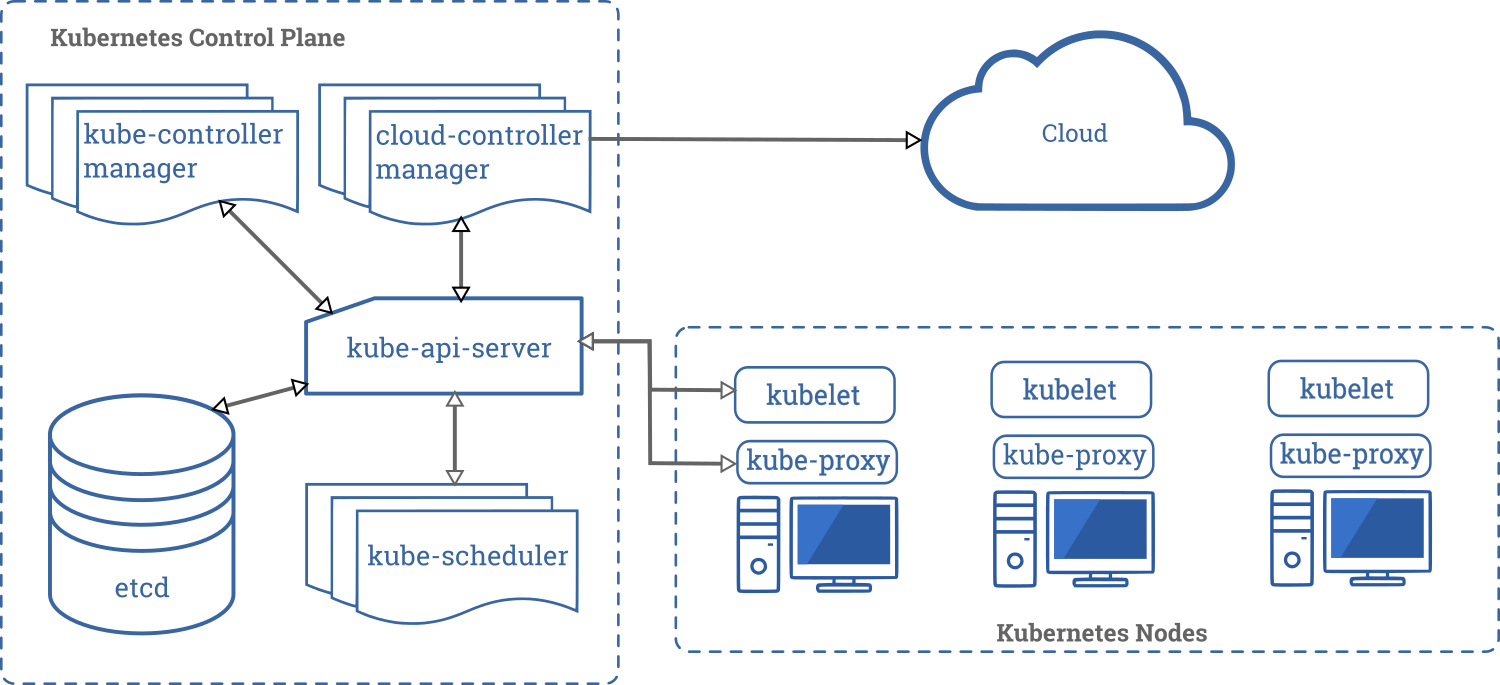
The API server is the glue which binds everything together and will be the entry point into Kubernetes that we’ll leverage through kubectl. For a more complete understanding of how things work you should visit the Kubernetes Documents Home.
While there’s many great environments for learning Kubernetes such as:
In the examples which follow we’ll use Docker Desktop with Kubernetes.
Install Docker Desktop for your OS version
If all goes well with the Docker Desktop install you can right click the tray icon, click settings and the Desktop should show Docker and Kubernetes both running.

As a prerequisite for the examples i’ve created a Simple Micro Service in Go which we’ll deploy to Kubernetes. Or if you prefer, you can pull the container from my Docker repo.
If you use my Docker repo version, i’ve been adding some enrichment’s which aren’t reflected in the Simple Micro Service post.
# pulling container from Docker Hub
$ docker pull mitchd/basic-svc:latest
If the install was too easy for you, or if you would prefer to understand in detail how all the moving parts are working, I recommend you visit Kelsey Hightower’s – Kubernetes the hard way.
My examples were run on:
Docker Engine: v19.03.5
Kubernetes: v1.15.5
Kubernetes Examples
# Getting info about your Kubernetes cluster
kubectl cluster-info

Kubernetes master is running at https://kubernetes.docker.internal:6443
KubeDNS is running at https://kubernetes.docker.internal:6443/api/v1/namespaces/kube-system/services/kube-dns:dns/proxy
If Kubernetes is up and running you should see a message indicating the locations where Kubernetes and KubeDNS are running. The kubectl get command will provide you with info about your pods, replicasets, deployments and services. We’ll go through some examples shortly.
As you gain experience with Kubernetes most of your interactions will be performed by sending in YAML files. YAML can be pretty fussy about indentation and spacing, so if it’s new to you try be sure to review some background material before going forward.
The kubctl get comand sets will also allow you to pass a -o flag to view a wide output or format the results as YAML or JSON. The YAML you create will usually be enriched with additional details after it’s submitted to Kubernetes. What comes back out is usually much more expansive than what went in.
Example YAML file to deploy our pod – scripts/pod-def.yaml
apiVersion: v1

kind: Pod

metadata:
  name: myapp-pod
  labels:
    app: myapp
    mylabel: demo-purposes
    location: dev
    aka: crash-dummy

spec:
  containers:
  - image: mitchd/basic-svc
    name: mysvc
    ports:
    - containerPort: 8083
      protocol: TCP
As you can see in the title above I keep my YAML files in a scripts folder, this one is located relative to the current directory in scripts/pod-def.yaml. Lets go ahead and create our pod and deploy the container to it. Many kubectl commands can be abbreviated, we’ll cover them as we go along.
Create pod, deploy container
$ kubectl create -f scripts\pod-def.yaml
pod/myapp-pod created

# lets see if our pod is running
$ kubectl get pods
NAME        READY   STATUS    RESTARTS   AGE
myapp-pod   1/1     Running   0          69s

# the abbreviation for pods is po
# get the info for just our pod, as you build our your cluster 'get all' may show many pods
kubectl get po myapp-pod

# Wide listing
kubectl get pods -o wide
NAME        READY   STATUS    RESTARTS   AGE     IP          NODE             NOMINATED NODE   READINESS GATES
myapp-pod   1/1     Running   0          4m34s   10.1.0.32   docker-desktop   <none>           <none>
YAML file enriched by Kubernetes
# specify output as yaml, you can redirect to a file and use it later in a create
# kubectl get po myapp-pod -o yaml > scripts/my-pod.yaml
$ kubectl get po myapp-pod -o yaml

apiVersion: v1
kind: Pod
metadata:
  creationTimestamp: "2020-02-18T16:01:12Z"
  labels:
    aka: crash-dummy
    app: myapp
    location: dev
    mylabel: demo-purposes
  name: myapp-pod
  namespace: default
  resourceVersion: "285048"
  selfLink: /api/v1/namespaces/default/pods/myapp-pod
  uid: f9b49794-5f1b-49d2-b027-9659943dee69
spec:
  containers:
  - image: mitchd/basic-svc
    imagePullPolicy: Always
    name: mysvc
    ports:
    - containerPort: 8083
      protocol: TCP
    resources: {}
    terminationMessagePath: /dev/termination-log
    terminationMessagePolicy: File
    volumeMounts:
    - mountPath: /var/run/secrets/kubernetes.io/serviceaccount
      name: default-token-zjzrf
      readOnly: true
  dnsPolicy: ClusterFirst
  enableServiceLinks: true
  nodeName: docker-desktop
  priority: 0
  restartPolicy: Always
  schedulerName: default-scheduler
  securityContext: {}
  serviceAccount: default
  serviceAccountName: default
  terminationGracePeriodSeconds: 30
  tolerations:
  - effect: NoExecute
    key: node.kubernetes.io/not-ready
    operator: Exists
    tolerationSeconds: 300
  - effect: NoExecute
    key: node.kubernetes.io/unreachable
    operator: Exists
    tolerationSeconds: 300
  volumes:
  - name: default-token-zjzrf
    secret:
      defaultMode: 420
      secretName: default-token-zjzrf
status:
  conditions:
  - lastProbeTime: null
    lastTransitionTime: "2020-02-18T16:01:12Z"
    status: "True"
    type: Initialized
  - lastProbeTime: null
    lastTransitionTime: "2020-02-18T16:01:14Z"
    status: "True"
    type: Ready
  - lastProbeTime: null
    lastTransitionTime: "2020-02-18T16:01:14Z"
    status: "True"
    type: ContainersReady
  - lastProbeTime: null
    lastTransitionTime: "2020-02-18T16:01:12Z"
    status: "True"
    type: PodScheduled
  containerStatuses:
  - containerID: docker://b17bdfb94ea8ec98cc8cf32d55044ef022b8f243972f45fceb841d26114a60fb
    image: mitchd/basic-svc:latest
    imageID: docker-pullable://mitchd/basic-svc@sha256:bb68e84c2fffedcb731b07c69006af21090cc715a99f5ba8c8fd10e80d67a6ae
    lastState: {}
    name: mysvc
    ready: true
    restartCount: 0
    state:
      running:
        startedAt: "2020-02-18T16:01:13Z"
  hostIP: 192.168.65.3
  phase: Running
  podIP: 10.1.0.32
  qosClass: BestEffort
  startTime: "2020-02-18T16:01:12Z"
As you can see that a lot more info than what we started with!
Deploy another container instance
# Deploy another instance of our service
$ kubectl run mysvc --image mitchd/basic-svc
deployment.apps/mysvc created

$ kubectl get all
NAME                         READY   STATUS    RESTARTS   AGE
pod/myapp-pod                1/1     Running   0          43m
pod/mysvc-798c7d6fd8-h4bs5   1/1     Running   0          8s


NAME                 TYPE        CLUSTER-IP   EXTERNAL-IP   PORT(S)   AGE
service/kubernetes   ClusterIP   10.96.0.1    <none>        443/TCP   66m


NAME                    READY   UP-TO-DATE   AVAILABLE   AGE
deployment.apps/mysvc   1/1     1            1           8s

NAME                               DESIRED   CURRENT   READY   AGE
replicaset.apps/mysvc-798c7d6fd8   1         1         1       8s
Note that we we use the run command, we now have a deployment, service and replicaset created.
When we created our initial YAML description we added some labels. The labels allow for a number of different types of searches. When there’s a large number of pods deployed in a cluster, you’ll want to filter down to a smaller set that you’re interested in. Note that the generated names will be different for your instance.
Label Examples
# Search for pods labeled as app and aka
$ kubectl get po -L app,aka
NAME                     READY   STATUS    RESTARTS   AGE     APP     AKA
myapp-pod                1/1     Running   0          50m     myapp   crash-dummy
mysvc-798c7d6fd8-h4bs5   1/1     Running   0          7m17s

# Now retrieve just those pods that have our label
$ kubectl get po -l aka
NAME        READY   STATUS    RESTARTS   AGE
myapp-pod   1/1     Running   0          51m

# return pods with no label aka
$ kubectl get po -l "!aka"
NAME                     READY   STATUS    RESTARTS   AGE
mysvc-798c7d6fd8-h4bs5   1/1     Running   0          11m
Logging examples
# view log of our service, to tail the log use: logs -f
$ kubectl logs myapp-pod
2020/02/18 16:01:13 Basic service running: http://0.0.0.0:8083
Typically our services will be behind a load balancer and inbound requests will be distributed to the instances. But, there are times where you might want to send messages for debugging purposes to a specific instance. To do that you could create a port forwarder. Open a new shell to run the port forwarding proxy and in another send some messages.
# create a port forwarder
$ kubectl port-forward myapp-pod 8083:8083
Forwarding from 127.0.0.1:8083 -> 8083
Forwarding from [::1]:8083 -> 8083

# send a message using httpie
#   in curl: curl http://localhost:8083/health
$ http :8083/health
HTTP/1.1 200 OK
Content-Length: 48
Content-Type: application/json; charset=utf-8
Date: Tue, 18 Feb 2020 17:07:29 GMT

{
    "Hostname": "myapp-pod",
    "IpAddress": "10.1.0.32"
}
When you’re done with the port forwarder, enter ^C in the terminal.
We’ve come a long way in these examples together. In a future post we’ll take a look at different Kubernetes controllers. Now like good campers we’ll clean up our site before moving on.
Clean-up environment
# nuclear option
# kubectl delete all --all

# lets get the names of the pods and controllers your running and delete each
$ kubectl get all

$ kubectl delete deployment.apps/mysvc

# now delete our service pod
$ kubectl delete pod/myapp-podMitch Dresdner
Mitch enjoys tinkering with tech across a wide range of disciplines. He loves learning new things and sharing his interests. His work interests run the gamut of: application integration, scalable secure clusters, embedded systems, and user interfaces. After hours you might find him dabbling in the hobby space with Raspberry Pi's, drones, photography, home wine making and other ferments.