
Our earlier Kubernetes examples work well in the Cloud, but can we run minimal HA clusters in smaller footprints or in embedded systems?

In cooking, reduction is the process of thickening and intensifying the flavor of a liquid mixture such as a soup, sauce, wine, or juice by simmering or boiling. In software engineering reduction is a process of: refactoring an application to minimize resource usage so an application can perform well in environments where resources or compute capacity are limited, yet preserving or enhancing core capabilities.
Instead of bringing our kettles to a boil to reduce a sauce, we’ll take a look at an already reduced Kubernetes implementation capable of running in a minimal resource environment, such as an embedded processor. There’s lots of great Kubernetes implementations in the market that you can get started with. My primary goal was to find one that I could experiment with using my Raspberry Pi’s in my mad scientist’s lab. My goal presented some interesting challenges such as:
- The solution must run on an ARM7 processor
- It must be able to run in a small memory and resource footprint
- The runtime services shouldn’t be resource intensive

The implementation I chose is one which seems to be standing out more and more from the crowd, Rancher K3S.
Recent Forrester research shows Rancher pulling away from the pack when considering their strategic vision and capabilities. Rancher received Forrester’s leader rating based upon it’s: runtime and orchestration, security features, image management, vision and future roadmap.
The most common use case which Rancher is it’s practical application to edge computing environments. Edge computing is a distributed computing paradigm which brings computation and data storage closer to the location where it is needed, to improve response times and save bandwidth.
To create a reduced Kubernetes implementation footprint, Rancher removed etcd and a large part of cloud support, these being the larger heavyweight components of most core Kubernetes implementations. They also replaced Docker with contained and use flannel to create virtual networks that give a subnet to each host for use with container runtimes. In removing etcd, they needed a new mechanism for supporting a distributed key/value store. There are several ways K3S can be configured to support the distributed key/value store and high availability (HA) including:
- Embedded SQLite DB (not HA)
- Using a HA RDMBS such as MySQL
- Embedded HA DQLite (experimental at this time)
In this post we’ll be installing the simpler embedded SQLite in order to focus our time on getting a K3S cluster up and running. In a future post we may explore the more battled hardened implementations.

A complete K3S server implementation runs within a single application space. Agent nodes are registered using a websocket connection initiated by the K3S agent process. The connections are maintained by a client-side load balancer which runs as part of the agent process.
Agents register with the server using the node cluster secret along with a randomly generated password for the node. Passwords are stored in /etc/rancher/node/password. The server stores passwords for individual nodes in /var/lib/rancher/k3s/server/cred/node-passwd. Subsequent attempts must use the same password.
Here’s a great introduction to K3S by creator, Chief Architect and Rancher Labs co-founder Darren Shepherd.
We’ll look more at the configurations settings as we get into the installation and configurations, so lets get started. The installation process couldn’t be much simpler. We’ll download and install the latest K3S application, which is a self extracting binary that installs K3S and runs as a Linux service. The size of the binary download weighs in at slightly less than 50MB and the extracted runtime footprint consumes a tad less than 300MB.
Raspberry Pi Cluster
| Name | Type | Notes |
| Viper | Pi 4 | Server |
| Cobra | Pi 4 | Worker |
| Adder | Pi 4 | Worker |
| Chum | Pi 3 | Worker |
| Nectarine | Pi Zero | Worker |
Note: To install on Pi3 and Pi Zero I had to run a pre-requisite prior to running the worker install (below) that I didn’t run for the Pi4.
Instructions for this pre-requisite.
The first command sudo iptables -F didn’t work, but the last 3 resolved my initial error: modprobe br_netfilter (code=exited, status=1/FAILURE)
The pre-requisite commands below enabled Pi3 and Pi Zero to join cluster
# Had to run on Pi3 and Pi Zero Workers before running Worker install
# This one didn't work: sudo iptables -F
sudo update-alternatives --set iptables /usr/sbin/iptables-legacy
sudo update-alternatives --set ip6tables /usr/sbin/ip6tables-legacy
sudo reboot
Installing the K3S Server
# Install the k3s latest release
mitch@viper:~ $ curl -sfL https://get.k3s.io | sh -
[INFO] Finding latest release
[INFO] Using v1.17.4+k3s1 as release
[INFO] Downloading hash https://github.com/rancher/k3s/releases/download/v1.17.4+k3s1/sha256sum-arm.txt
[INFO] Downloading binary https://github.com/rancher/k3s/releases/download/v1.17.4+k3s1/k3s-armhf
[INFO] Verifying binary download
[INFO] Installing k3s to /usr/local/bin/k3s
[INFO] Creating /usr/local/bin/kubectl symlink to k3s
[INFO] Creating /usr/local/bin/crictl symlink to k3s
[INFO] Creating /usr/local/bin/ctr symlink to k3s
[INFO] Creating killall script /usr/local/bin/k3s-killall.sh
[INFO] Creating uninstall script /usr/local/bin/k3s-uninstall.sh
[INFO] env: Creating environment file /etc/systemd/system/k3s.service.env
[INFO] systemd: Creating service file /etc/systemd/system/k3s.service
[INFO] systemd: Enabling k3s unit
Created symlink /etc/systemd/system/multi-user.target.wants/k3s.service → /etc/systemd/system/k3s.service.
[INFO] systemd: Starting k3s
# check the status or the k3s server
mitch@viper:~ $ sudo systemctl status k3s
● k3s.service - Lightweight Kubernetes
Loaded: loaded (/etc/systemd/system/k3s.service; enabled; vendor preset: enabled)
Active: active (running) since Fri 2020-04-03 10:19:01 EDT; 23h ago
Docs: https://k3s.io
Process: 2115 ExecStartPre=/sbin/modprobe br_netfilter (code=exited, status=0/SUCCESS)
Process: 2118 ExecStartPre=/sbin/modprobe overlay (code=exited, status=0/SUCCESS)
Main PID: 2119 (k3s-server)
Tasks: 93
Memory: 691.0M
# check to see if our node has been created
mitch@viper:~ $ sudo kubectl get nodes
NAME STATUS ROLES AGE VERSION
viper Ready master 48s v1.17.4+k3s1
# lets see what pods we have running
mitch@viper:~ $ sudo kubectl get pods --all-namespaces
NAMESPACE NAME READY STATUS RESTARTS AGE
kube-system local-path-provisioner-58fb86bdfd-h5glv 1/1 Running 0 1m
kube-system metrics-server-6d684c7b5-jx9sh 1/1 Running 0 2m
kube-system coredns-6c6bb68b64-4qbjb 1/1 Running 0 2m
kube-system helm-install-traefik-l8kn7 0/1 Completed 1 2m
kube-system svclb-traefik-k6dtb 2/2 Running 0 2m
kube-system traefik-7b8b884c8-b9cwv 1/1 Running 0 2m
kube-system svclb-traefik-k49ct 2/2 Running 0 2m
# what namespaces have been created
mitch@viper:~ $ sudo kubectl get deployments --all-namespaces
NAMESPACE NAME READY UP-TO-DATE AVAILABLE AGE
kube-system local-path-provisioner 1/1 1 1 3m
kube-system metrics-server 1/1 1 1 3m
kube-system coredns 1/1 1 1 3m
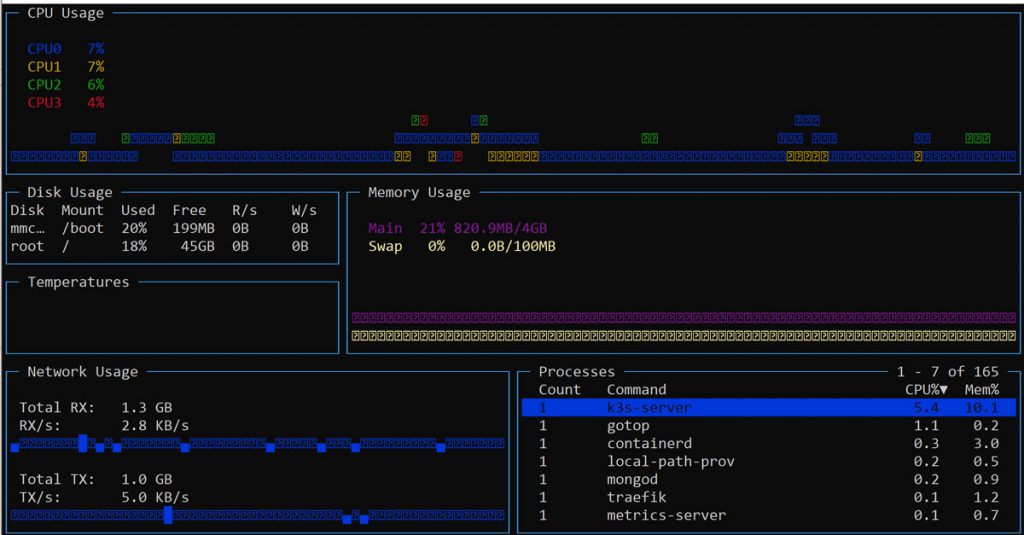
kube-system traefik 1/1 1 1 3mWith our server up and running lets take a look at the performance characteristics. In the gotop snapshot below note that the quad-core CPU’s are barely breathing hard, memory consumption is hovering around 20% and there’s ample room to scale up.
Next we’ll install our worker nodes. When installing K3S it checks for the presence of environment variables: K3S_URL and K3S_TOKEN. When it finds K3S_URL it assumes we’re installing a worker node and uses the K3S_TOKEN value to connect to the cluster. The token can be found on the server in this file: /var/lib/rancher/k3s/server/node-token .
Note: Each machine must have a unique hostname. If your machines do not have unique hostnames, pass the
K3S_NODE_NAMEenvironment variable and provide a value with a valid and unique hostname for each node.
Install both of the worker nodes using these commands
# To get the token run this on the Server
mitch@viper:~ $ sudo cat /var/lib/rancher/k3s/server/node-token
K102568cef44c7f67c01f595b8294f2b16bb7e0459907d1703b8ab452c2b72c5514::server:e0c6a36e0bf23ef6631bacde51e1bc65

# install each worker by running the following:
mitch@cobra:~ $ export K3S_URL="https://viper:6443"

mitch@cobra:~ $ export K3S_TOKEN="K102568cef44c7f67c01f595b8294f2b16bb7e0459907d1703b8ab452c2b72c5514::server:e0c6a36e0bf23ef6631bacde51e1bc65"

# install worker
mitch@cobra:~ $ curl -sfL https://get.k3s.io | sh -

# verify the worker status
mitch@cobra:~ $ sudo systemctl status k3s-agent

# from the server, check to see if it discovered the worker
mitch@viper:~ $ sudo kubectl get nodes

NAME    STATUS   ROLES    AGE     VERSION
viper   Ready    master   25h     v1.17.4+k3s1
cobra   Ready    <none>   3m31s   v1.17.4+k3s1

# Repeat these steps for each worker
With our cluster up and running lets deploy an example container.
Deploy an nginx container
mitch@viper:~ $ k3s kubectl run mynginx --image=nginx --port=80

# wait for nginx to complete startup
mitch@viper:~ $ sudo watch kubectl get po
NAME                       READY   STATUS    RESTARTS   AGE
mynginx-7f79686c94-bxb6t   1/1     Running   0          13m

# expose nginx
mitch@viper:~ $ k3s kubectl expose deployment mynginx --port 80

# retrieve endpoint for nginx
mitch@viper:~ $ k3s kubectl get endpoints mynginx
NAME      ENDPOINTS      AGE
mynginx   10.42.2.3:80   30s

# curl the endpoint
mitch@viper:~ $ curl http://10.42.2.3:80

<!DOCTYPE html>
<html>
<head>
<title>Welcome to nginx!</title>
<style>
    body {
        width: 35em;
        margin: 0 auto;
        font-family: Tahoma, Verdana, Arial, sans-serif;
    }
</style>
</head>
<body>
<h1>Welcome to nginx!</h1>
<p>If you see this page, the nginx web server is successfully installed and
working. Further configuration is required.</p>

<p>For online documentation and support please refer to
<a href="http://nginx.org/">nginx.org</a>.<br/>
Commercial support is available at
<a href="http://nginx.com/">nginx.com</a>.</p>

<p><em>Thank you for using nginx.</em></p>
</body>
</html>
To install additional containers you might consider using Helm, the Kubernetes package manager. Helm comes in binary form for your target platform, you can download the latest release here. Be sure to install the ARM version, not the ARM64 version if you’re running on Pi3 or Pi4. While the armhf processor supports 64 bits, versions of Raspian at the time of this writing are compiled to run 32 bit applications. Here’s how you an install Helm.
Installing Helm
# set the version you wish to install
export HELM_VERSION=3.0.2

# download helm and un-tar
wget https://get.helm.sh/helm-v$HELM_VERSION-linux-arm.tar.gz
tar xvf helm-v$HELM_VERSION-linux-arm.tar.gz

# see if it works
linux-arm/helm ls

# move helm to a location in your path
sudo mv linux-arm/helm /usr/local/bin

# cleanup
rm -rf helm-v$HELM_VERSION-linux-arm.tar.gz linux-arm

# Note: if you downloaded the arm64 bit version you would get this error
#  linux-arm64/helm help
#  -bash: linux-arm64/helm: cannot execute binary file: Exec format error
With helm installed you can configure it to reference the latest repositories and to work with the cluster you configured.
# configure helm  to add the official stable charts repository:
helm repo add stable https://kubernetes-charts.storage.googleapis.com/

# add bitnami repository:
helm repo add bitnami https://charts.bitnami.com/bitnami
With the Helm repositories configured we can now install applications into our cluster. If you would like to install the Kubernetes Dashboard follow the installation procedures here.
At this point you have everything you need to create, replicate, install and run your applications in K3S. After you’re done playing with your K3S cluster you can tear it down and cleanup artifacts using the following commands.
K3S cluster cleanup
# Uninstall K3S Server
/usr/local/bin/k3s-uninstall.sh

# Uninstall K3S Agents
/usr/local/bin/k3s-agent-uninstall.sh
I hope you’ve enjoyed this brief introduction on getting started with K3S in resource limited environments. I look forward to expanding upon these basic building blocks in future posts!
Mitch Dresdner
Mitch enjoys tinkering with tech across a wide range of disciplines. He loves learning new things and sharing his interests. His work interests run the gamut of: application integration, scalable secure clusters, embedded systems, and user interfaces. After hours you might find him dabbling in the hobby space with Raspberry Pi's, drones, photography, home wine making and other ferments.