
With some basic equipment, a little bit of time and a passion for the very best – anyone can make mouth watering succulent ribs!
We all have our own preference when it comes to the best style of ribs. Some prefer Carolina style or Memphis style or Kansas City, and they’re all good. Having had some time to immerse myself riding the BBQ Trail, the hands down winner for me is Texas style, dry rubbed with a Southwestern medley of the right blend of seasoning, herbs and spices. When I make a rub, i’ll scale up the recipe to get a good 3 – 4 uses from it. Here’s my basic go to dry rub recipe:
Use on Ribs, Chicken, Flank Steak, whatever …
| 4 Tbs paprika | 1.3Tbs black pepper |
| 4 Tbs garlic powder | 1.3 Tbs oregano |
| 3 Tbs kosher salt | 1 Tbs cayenne |
| 3 Tbs brown sugar | 1 Tbs coriander |
| 1.3 Tbs sage | 1 Tbs cumin |

The oregano and sage are picked and dried from my wife Diane’s herb garden outside of our front door. If you don’t have your own herb garden the store bought will do.
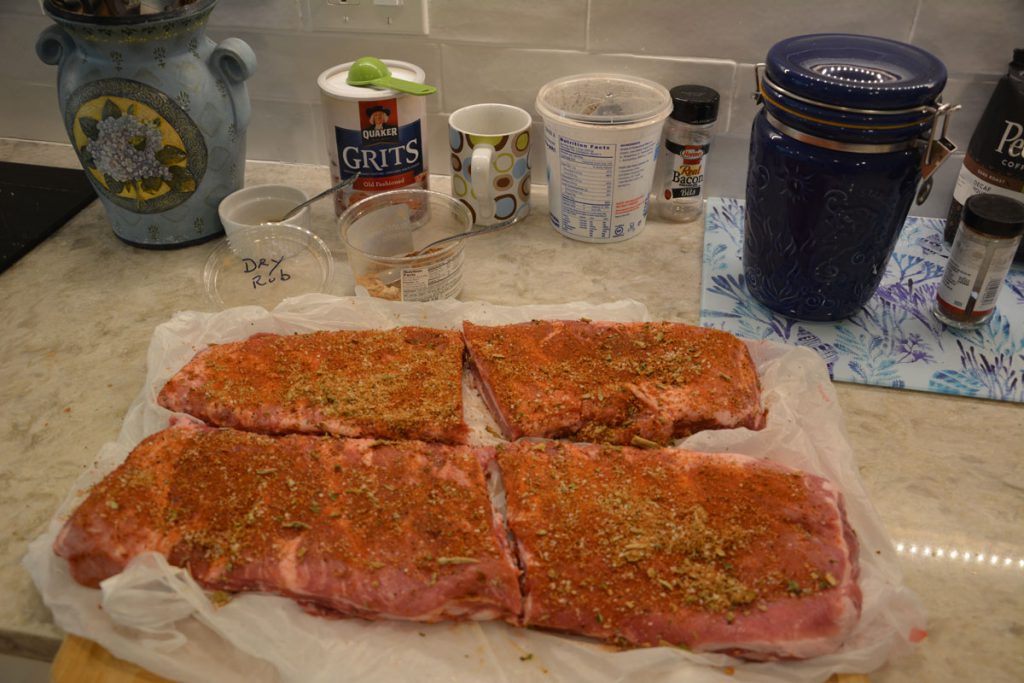
After removing the meat from the plastic wrapper I like to run it under that faucet to remove any leftover smells from packaging. Next i’ll pat the meat dry with paper towels to remove as much moisture as possible from the surface of the meat. Then it’s time to apply the dry rub. I’ll sprinkle the dry rub on both sides of the meat applying a more generous portion to the meaty side. I apply the rub with a spoon to keep from contaminating unused mix. Using your hands apply the rub to the meat as if you’re applying lotion to your hands.
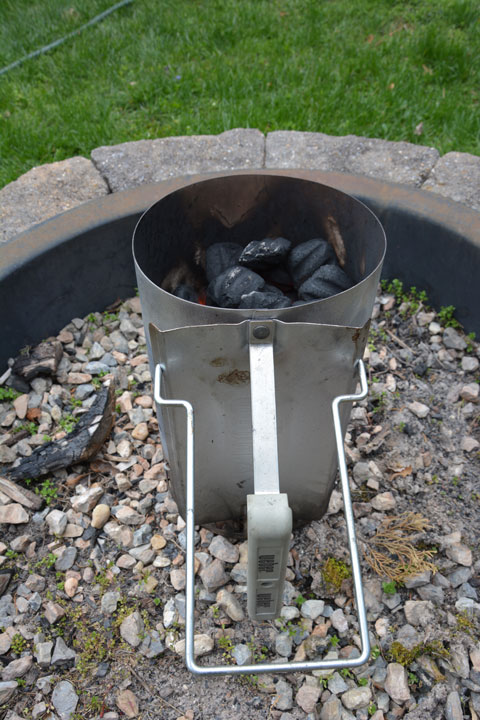
Before applying the dry rub I usually load the charcoal into the chimney and light the fire. It can sometimes take 20 minutes for the coals to burn down to hot glowing embers so it’s good to have this task running in parallel.
In the bottom of the chimney i’ll crumple a few pages from the newspaper, not packing too tight, but just enough to catch fire easily when surrounded by pockets of air. I let the chimney rest in our fire-pit while the coals are turning into embers. You’ll need a safe place like this to keep it so to not accidentally catch the back yard on fire. Nothing will irritate first responders more than coming out to extinguish your yard fire, before your delicious ribs have are cooked!
Staging the Smoker
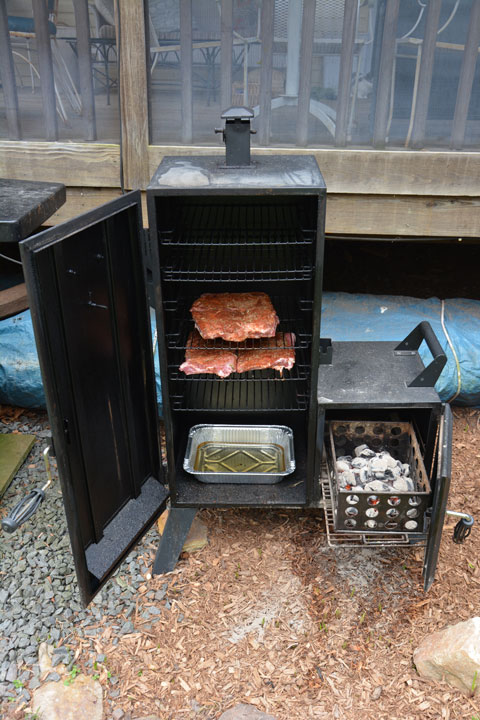
The smoker I use is an moderately priced Dyna Glo with an offset chamber which provides indirect heat. Our goal is to smoke at a temperature that we’ll hold to 225 – 250 degrees F (the thermometer’s ideal region), this technique is commonly referred to as cooking low and slow.
The reason for the lower temperature is to induce a chemical reaction between amino acids in proteins while reducing sugars in the meat. This reaction will cause a browning of the meat known as the Maillard reaction. The slow cooking will lead to a crunchy crust and develop a richness and depth of flavors and texture. I use a long set of tongs for re-positioning the meat as it cooks and to push hot coals into the offset chamber. You want to be extra careful not to touch any of the hot surfaces.
Another thing I do is to add a drip container to the bottom of the chamber. It both helps to keep the floor of the smoker clean and provides additional moisture to the chamber as the food cooks. I fill the drip container about half way with a mixture of water and apple cider vinegar or a fruit juice. It’s up to you how you adjust the percentage of water to juice flavors. You might consider starting simple with 15 – 20% juice to water and increase from there if you would like more of the steamy fruity flavors.

The hot coals from the chimney should be the last thing which goes into the smoker before you close the door. As you can see from the picture I have some wood mulch under my smoker. As you add more coal to the chamber there will be small hot embers which fall to the ground. To ensure that I don’t cause an outside fire, I soak the area beneath the offset chamber with water before the hot coals go in. The last thing I do before the door is close is to add some hardwood chips like: apple, cedar, mesquite or hickory. It won’t take long before you see the smoke billowing out from the smoker. The external thermometer on the door begins to climb into the ideal range. You’ll want to keep a close eye on the temperature and feed to coals to keep the cooking temperature in the ideal region. I’ve found that adding between 10 – 15 briquettes and wood chips on the half hours to be a good average.
At this time you can go into maintenance mode, tending the fire, tending to your guests, enjoying some cold beer if it’s an especially hot day, or just enjoying the beer anyway.
How much smokiness will you need? This is a subjective question, the answer is – it’s going to be however much you like. It might take you a few trial and error runs to figure this out. The next question you’re probably wondering is – when will the ribs be done?
You can’t tell when they’re done just by looking, you’ll need a temperature probe. Good, accurate thermometers can be obtained for less than $20. The USDA recommendation for food safety is 145 degrees F for ribs. Diane prefers wet ribs to dry, so after a rack reaches safe temperature i’ll pull a dry rack for myself and paint the remaining rack with a wet sauce.
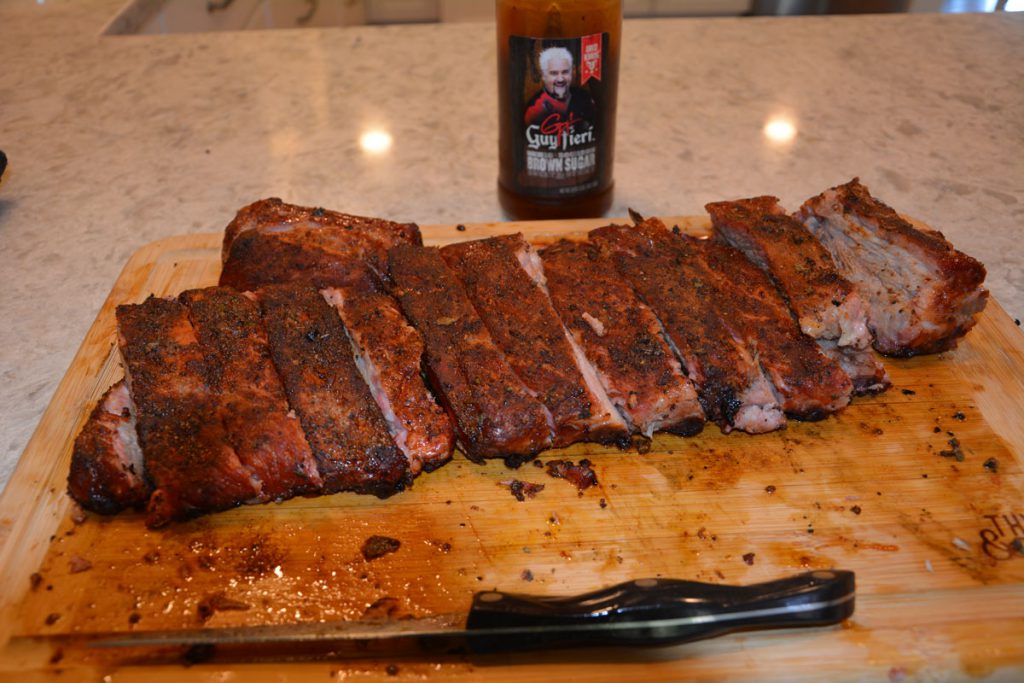
The wet rack will go back into the smoker for an additional 20 – 30 minutes or until it begins to caramelize. Keep some of your favorite dipping sauce handy to drizzle over the top of them.
I hope all of this talk about smoking meats has inspired you to get out into you back yard and give it a try.
Bon appétit!
Mitch Dresdner
Mitch enjoys tinkering with tech across a wide range of disciplines. He loves learning new things and sharing his interests. His work interests run the gamut of: application integration, scalable secure clusters, embedded systems, and user interfaces. After hours you might find him dabbling in the hobby space with Raspberry Pi's, drones, photography, home wine making and other ferments.