
Enable TLS using Self Signed Certificates for your Go Micro Services.
When it comes to securing your applications it’s up to you to understand all the moving parts. In this post we’re going to discuss how to go about adding Mutual Authentication between Client and Server using Go. As a refresher, you may wish to review some of the underlying concepts. Much has been said about these concepts already, so out focus here will be on implementing a solution.
Refresher
We’ll first create a Self Signed Certificate chain using the generate.sh script created by Nicholas Jackson. The script will create for us: Root, Intermediate, Application and Client Certifiates.
Certificates created by generate.sh for domain viper.mynet
.
├── 1_root
│   ├── certs
│   │   └── ca.cert.pem
│   ├── index.txt
│   ├── index.txt.attr
│   ├── index.txt.old
│   ├── newcerts
│   │   └── 100212.pem
│   ├── private
│   │   └── ca.key.pem
│   ├── serial
│   └── serial.old
├── 2_intermediate
│   ├── certs
│   │   ├── ca-chain.cert.pem
│   │   └── intermediate.cert.pem
│   ├── csr
│   │   └── intermediate.csr.pem
│   ├── index.txt
│   ├── index.txt.attr
│   ├── index.txt.attr.old
│   ├── index.txt.old
│   ├── newcerts
│   │   ├── 100212.pem
│   │   └── 100213.pem
│   ├── private
│   │   └── intermediate.key.pem
│   ├── serial
│   └── serial.old
├── 3_application
│   ├── certs
│   │   └── viper.mynet.cert.pem
│   ├── csr
│   │   └── viper.mynet.csr.pem
│   └── private
│       └── viper.mynet.key.pem
├── 4_client
│   ├── certs
│   │   └── viper.mynet.cert.pem
│   ├── csr
│   │   └── viper.mynet.csr.pem
│   └── private
│       └── viper.mynet.key.pem
├── generate.sh
├── intermediate_openssl.cnf
├── LICENSE
├── main.go
├── openssl.cnf
└── README.md
Recall from the refresher above, the Certificate Chain consists of a Root and Intermediate Certifiates. Intermediate Certifiates are used by your Server and are signed by the RootCA. If your Root Certificate were to be compromised, you’d have to reissue certificates for clients. This practice helps to ensure less risk and exposure if something goes wrong.
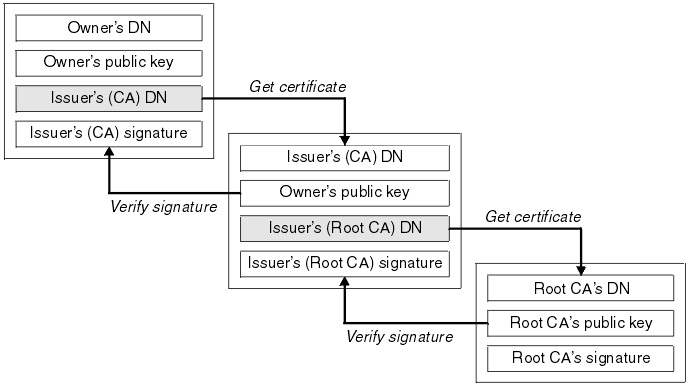
Each link in the chain is digitally signed to ensure authenticity and to prevent Man In The Middle (MITM) attacks. Certificates cost money, but if you have a production application you’ll need certificates signed by a Root CA or your application won’t be trusted. If you’re trying to understand TLS or if your backend services can be trusted by you, the creator, the self signed certificates we’ll be creating may a viable option.
Once you’ve cloned and changed into the directory containing generate.sh you can create the certificate chain for mutual authentication. In our example we’ll be using two Raspberry Pi4’s in my lab environment, on as Client the other as Server. Change the domain references for your setup accordingly.
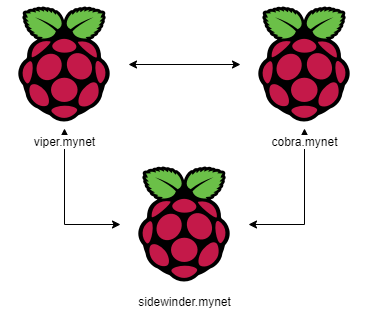
My home laboratory consists of several Raspberry Pi’s, but for the sake of this article we’ll be using host viper.mynet as the Server and cobra.mynet as Client.
The sidewinder.mynet host can be another client in the configuration using the client certificate and code.
Lets get started by creating the client and server certificates.
Create your certificates using generate.sh
# run generate.sh providing a domain and a password for the Root key
$ ./generate.sh viper.mynet your-cert-password
With the certificates created, lets create a folder and copy in the client and server certificates we’ll be using.
Copy client and server certificates
# create a dist folder and copy in the certificates
$ mkdir dist

$ cp 2_intermediate/certs/ca-chain.cert.pem dist/serverCrt.pem
$ cp 4_client/certs/viper.mynet.cert.pem dist/clientCrt.pem
$ cp 4_client/private/viper.mynet.key.pem dist/clientKey.pem
Run the server application in main.go
# change the domain to the one you chose when creating the chain
$ go run main.go -domain viper.mynet

# use curl to verify the server is running
$ cd dist
$ curl -v --cacert serverCrt.pem --cert clientCrt.pem --key \
       clientKey.pem https://viper.fios-router.home:8443/

  ...
 Connection state changed (MAX_CONCURRENT_STREAMS == 250)!
< HTTP/2 200
< content-type: text/plain
< content-length: 13
< date: Sun, 12 Jul 2020 18:29:32 GMT
<
mTLS Success
If the mTLS response message looks a littl different from the server code, it’s because I changed the Hello World message and included a line break, otherwise note the 200 success.
You can also copy the certs in the dist folder to another machine and run the same command from remote.
Adding a Go client application
// mTLS client application
package main

import (
        "crypto/tls"
        "crypto/x509"
        "fmt"
        "io/ioutil"
        "log"
        "net/http"
)

func main() {
        var (
                err              error
                cert             tls.Certificate
                serverCert, body []byte
                pool             *x509.CertPool
                tlsConf          *tls.Config
                transport        *http.Transport
                client           *http.Client
                resp             *http.Response
        )

        // Reads and parses a public/private key pair from the PEM files
        if cert, err = tls.LoadX509KeyPair("clientCrt.pem", "clientKey.pem"); err != nil {
                log.Fatalln(err)
        }

        // Read the server certifiate
        if serverCert, err = ioutil.ReadFile("serverCrt.pem"); err != nil {
                log.Fatalln(err)
        }

        // Create a new empty certifiate pool then add the server certifiate to the pool
        pool = x509.NewCertPool()
        pool.AppendCertsFromPEM(serverCert)

        tlsConf = &tls.Config{
                Certificates: []tls.Certificate{cert},
                RootCAs:      pool,
        }
        tlsConf.BuildNameToCertificate()

        // Create the client transport
        transport = &http.Transport{
                TLSClientConfig: tlsConf,
        }
        client = &http.Client{
                Transport: transport,
        }

        // Change the address to your server
        if resp, err = client.Get("https://viper.mynet:8443/hello"); err != nil {
                log.Fatalln(err)
        }

        // Check result
        if body, err = ioutil.ReadAll(resp.Body); err != nil {
                log.Fatalln(err)
        }
        defer resp.Body.Close()

        fmt.Printf("mTLS Example Success - %s\n", body)
Run the client application
# run the client
# Be sure to copy over the certifiates in the Server dist to the folder main.go is in
$ go run main.go

# same response as curl, but from your go service

  ...

* Connection state changed (MAX_CONCURRENT_STREAMS == 250)!
< HTTP/2 200
< content-type: text/plain
< content-length: 13
< date: Sun, 12 Jul 2020 18:41:36 GMT
<
mTLS Success
From our examples above you should now be able to construct Go micro services using Mutual Authentication with Self Signed certificates.
Mitch Dresdner
Mitch enjoys tinkering with tech across a wide range of disciplines. He loves learning new things and sharing his interests. His work interests run the gamut of: application integration, scalable secure clusters, embedded systems, and user interfaces. After hours you might find him dabbling in the hobby space with Raspberry Pi's, drones, photography, home wine making and other ferments.