
Creating awesome dashboards within a TMux session
A terminal multiplexer allows you to control a number of terminal sessions to other hosts from within a single screen. It’s also able to preserve session state in case you happen to lose your connection to the host. You simply reconnect to your session and everything remains just as you left it. It’s pretty amazing!
In this article, we’ll take a look at some of the capabilities in tmux to help you get up and running quickly, or to give you a chance to kick the tires to see if you find it suitable to your work habits. I’ll be using a small lab or Raspberry Pi’s that we setup in an earlier post: moving Kubernetes closer to the bare metal. Feel free to recreate that lab if you like, or just follow along. I think you’ll be able to get the gist of tmux capabilities simply by following along.
Depending on the flavor of Linux you’re running on the package manager may vary.
The Raspian OS is based on a Debian release and we’ll be using apt. You may need to replace this with dnf, yum, brew, pacman or another package manager depending on your Linux flavor.
Installing tmux on Raspian
# install tmux on raspian
$ sudo apt install tmux
...
Setting up libutempter0:armhf (1.1.6-3) ...
Setting up tmux (2.8-3) ...
Processing triggers for man-db (2.8.5-2) ...
Processing triggers for libc-bin (2.28-10+rpi1) ...

# verify install
$ which tmux
/usr/bin/tmux

$ tmux list-keys
... lots of key bindings
The screen will display lots of key bindings. You can override the defaults for these binding as well as other default tmux behaviors. Enter the desired changes into ~/.tmux.conf to override defaults. We’ll explore some common overrides later in this article.
With tmux installed let’s go through some basic commands.
Start tmux with a session name
# name our sessions in case we need to resume it later
$ tmux new -s gs-tmux
We provided a session name to aid us if we need to recover from an error and readily find the session we would like to resume.
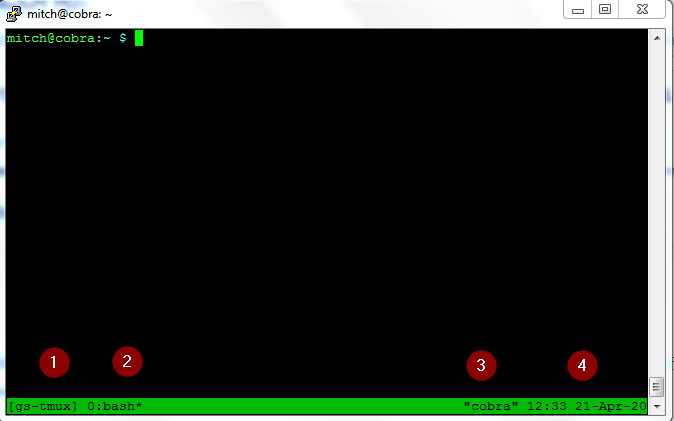
The initial display looks like a standard shell with a green status bar showing:
- Session Name
- Pseudo terminal namd
- Hostname
- Datetime
To interact with TMux you’ll enter a HotKey followed by a command. The default command key is Control-b, for which i’ll be using the shortcut form ^b. We’ll begin by creating 3 new shells by typing ^bc for a total of 3. You’ll notice in the status bar that you now have 3 shells.
Basic navigation exercises
# Create 3 shells
$ ^Bc
$ ^Bc
$ ^Bc

# status bar shows 3 bash shells

# Using ^Bn and ^Bp to advance to the next shell and prior
$ ls
$ ^bn
$ top
$ ^bn
$ echo "shell 3"
$ ^bp
$ ^bp

# Navigate using shell number with ^B[0..n]
$ ^b2
$ ^b1      # kill the top command with ^c

# to delete a shell use ^d
$ ^b2
$ ^d

# keep navigating back and forward until you get bored
Return to the first shell and lets rename the shell and create some panes.
# starting at shell-0 change the name to Control Plane
# using ^b,  backspace to clear old name, enter new name
$ ^b,
Control Plane
$^bn

# repeat for shell-1 and shell-2, using names: Worker1 and Worker2
# if you deleted and shells create with ^bn
$ ^b,
Worker1
$ ^bn
$ ^b,
Worker2

# return to shell-0 and create some panes
# create a row pane with ^b"
# create a column pane with ^b%
$ ^b"
$ ^b%

# navigate your panes using ^b and the arrow keys

# you can zoom in and out of a pane with ^bz
If you’re still with me you should have a tmux session that looks like the picture below.
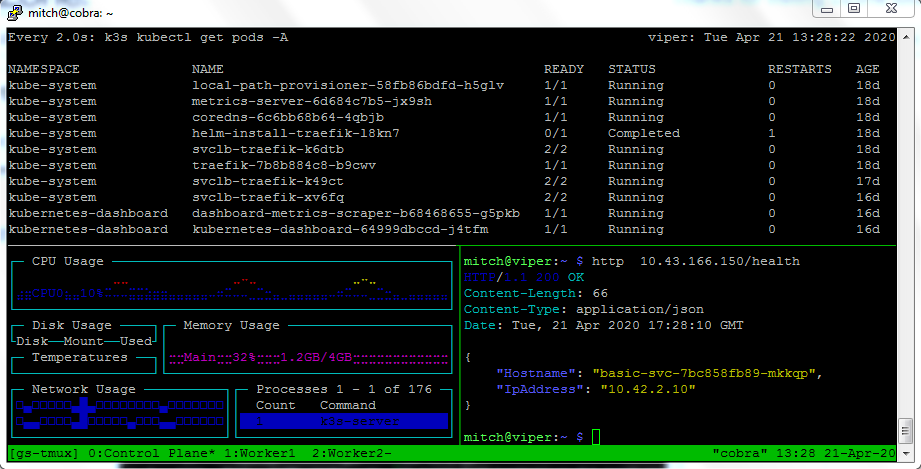
Note that the status bar now shows a more descriptive name for each shell. The Control Plane shell has 3 panes looking at 3 different views is the system. I hope you are getting a sense for the powerful dashboards you can create using TMux. In this session I went back to the demo lab we created for the project moving Kubernetes closer to the bare metal and am watching the performance using gotop while sending a JSON message to check the health of a custom POD we deployed.
Now lets simulate a fault by closing the shell.
Reconnect to our prior session
# log back into the host that was running your tmux session
#   list sessions
$ tmux list-sessions
gs-tmux: 3 windows (created Tue Apr 21 12:30:19 2020) [111x26]

# reattach to session
$ tmux attach-session -t gs-tmux
You should now have your session back as you last left it.
We’ve just scratched the surface on what you can do in tmux, but I hope it’s enough to whet your whistle and encourage you to dig in further. Before we leave you might consider playing with the .tmux.conf file to override some default settings. Here’s a few to get you started.
Some basic tmux default overrides
# reload configuration
bind r source-file ~/.tmux.conf \; display '~/.tmux.conf sourced'

# change history depth
set -g history-limit 50000

# begin shell numbering at 1 instead of 0
set -g base-index 1

# use ^a instead of ^b as HotKey
set-option -g prefix C-a
unbind-key C-a
bind-key C-a send-prefix
I hope you enjoyed this post and find tmux useful in your daily activities.
Mitch Dresdner
Mitch enjoys tinkering with tech across a wide range of disciplines. He loves learning new things and sharing his interests. His work interests run the gamut of: application integration, scalable secure clusters, embedded systems, and user interfaces. After hours you might find him dabbling in the hobby space with Raspberry Pi's, drones, photography, home wine making and other ferments.